This homemade croissants recipe will teach you how to make authentic croissants, the French way. No need to buy store-bought croissants ever again.

Table of Contents
Homemade croissant recipe
One of the best experiences I had in Europe was learning to bake French bread at Le Cordon Bleu in Paris. Let me start with the classic French croissant recipe. The buttery, flaky layers of a croissant fresh out of the oven are unlike any croissant from an American grocer’s bakery.
As you peel back the layers of dough, you become enamored in the crunchy edges and the moist center that echoes layer by layer. Making croissants is a labor of love, but the best part about this recipe is that you can make them over a weekend, roll and shape them, bake a few and freeze the rest to bake later.
The secret to great French bread is fresh cake yeast…not the powdered instant yeast you find in the baking aisle. In Europe, it’s sold in cubes near the refrigerated prepared pie crusts.
Another secret to this recipe is measuring by weight instead of standard measuring cups. You will need a digital kitchen scale. Target sells a nice one for around $30.
I baked this batch of flaky croissants while I was still in Vegas, and they were a sure hit. They’re great for breakfast and superb with chicken salad.

Croissants
Ingredients
- 13 grams salt
- 665 grams King Arthur’s All Purpose Flour
- 20 grams fresh yeast
- 65 grams sugar
- 400 grams water
- 350 grams butter
Instructions
Preparing the dough
- Mix: Mix salt, flour, yeast, sugar and water in mixer until a dough forms.
- Rest: Let the mixture rise uncovered at room temperature until doubled in size (about 2 hours).
- Cover: Then, rework the dough and place it in the refrigerator covered overnight. It needs 24 hours to ferment to get the best flavor.
Adding the butter
- Pound: After the dough has rested overnight, place the butter on the counter (granite is best), and pound it in the same direction with a rolling pin so that it is slightly softened and flattened. Flip it over, turn it 1/4 turn and flatten some more. If the butter is too hard, it will puncture the dough. It should be about 1/2-inch thick. Set aside.
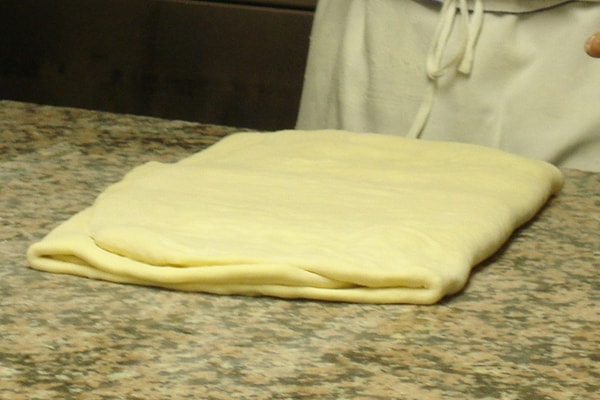
- Roll: Dust the counter with flour, and place the dough on the floured surface. Roll it flat like a pizza. Place the pounded butter on top and pull the sides of dough over the butter to cover it entirely. Press seams to enclose all of butter.
The 4 roll-n-folds
- This is the trick to all the flaky, buttery layers
Roll-n-fold 1
- Roll: With seams up, hold the rolling pin horizontal to your body and pound the dough in the same direction to lengthen. Roll in same direction until it’s the length of 1.5 rolling pins. Make sure it is never sticky. Dust lightly with flour if needed, but brush flour off when not needed. Once rolled out, dust off the flour.
- Fold: Fold one end in and then the other end in so it overlaps (like a trifold brochure). Flip the dough over and turn 1/4 turn, so that the openings are horizontal to you.
Roll-n-fold 2
- Roll: Hold the rolling pin horizontal to your body and roll again to lengthen to the same length. Dust off flour and fold like a trifold again. Turn 1/4 turn. Roll just a bit and flip it over. Roll it a bit more. Dust off flour on both sides.
- Wrap: Wrap in parchment paper, and put in refrigerator for 10-15 minutes.
Roll-n-fold 3
- Fold: Take it out of the fridge. Again, place the opening of the fold horizontal to your body. Dust with flour and roll to the length of 1.5 rolling pins. Fold like a trifold and flip it over.
Roll-n-fold 4
- Turn: Turn 1/4 turn. Roll again to length of 1.5 rolling pins. Clean off the flour while dough rests.
Last roll
- Roll: Turn 1/2 turn, roll more. Turn 1/2 turn, roll more. Turn 1/4 turn, so that the length of the dough is now horizontal to your body. Dust off flour on top and under dough. It should stick slightly to the granite. Roll one more time lengthwise.
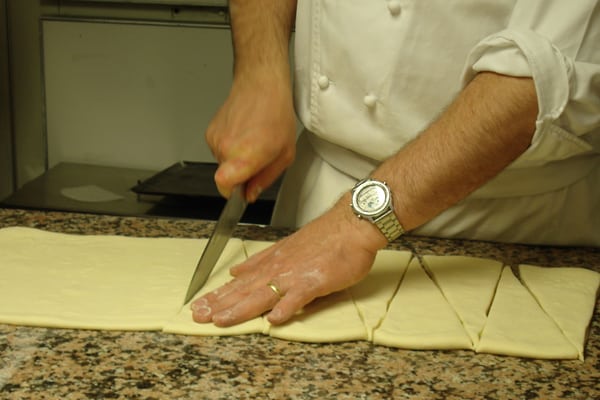
- Cut: Cut into triangles. Stretch a bit and roll the wide end in toward point. Place on parchment-lined pan. Seam side down.
- Brush: Brush egg wash (1 egg and one egg yolk whisked) on top and let rise.
Bake now…
- Bake: Brush with egg wash a second time. Then, bake at 370F until brown and flaky.
…or freeze
- Freeze: Instead of brushing with a second egg wash, place the unbaked croissants in the freezer. It’s best to place the parchment lined pan in the freezer. Once the croissants are frozen solid, you can place them in a Ziploc bag. When you’re ready to bake them. Take them out of the freezer to thaw. They will rise a little more.
- Bake: Brush with egg wash and bake at 370F until brown.
Nutrition
Nutrition information is automatically calculated, so should only be used as an approximation.
Ingredients for homemade croissants
- Salt
- King Arthur’s All Purpose Flour: Provides the structure and foundation for the croissant dough.
- Fresh cake yeast: Acts as a leavening agent, helping the dough rise and achieve a light, airy texture.
- Sugar: Adds sweetness to the dough and provides food for the yeast, promoting fermentation.
- Water
- Unsalted butter: Creates layers in the dough during the lamination process, resulting in the flaky, tender texture of croissants. Try to use European butter if you can, as it has a higher fat content, creating the perfect flaky French croissant.
See the full recipe card for servings and a full list of ingredients.
How to make authentic French croissants

Preparing the dough
- Mix: In the bowl of your mixer fitted with the dough hook attachment, mix salt, flour, yeast, sugar and water on low speed until a dough forms.
- Rest: Let the dough rest uncovered at room temperature until doubled in size (about 2 hours).
- Cover: Then, rework the dough and place it in the refrigerator covered overnight. It needs 24 hours to ferment to get the best flavor.
✔️ PRO TIP
Use cold butter so that it doesn’t melt into the dough as you’re rolling it.
Adding the butter
- Pound: After the dough has rested overnight, place the butter on the counter (granite is best), and pound it in the same direction with a rolling pin so that it is slightly softened and flattened. Flip it over, turn it 1/4 turn and flatten some more. If the butter is too hard, it will puncture the dough. It should be about 1/2-inch thick. Set aside.
- Roll: Place the dough on a lightly floured surface. Roll it flat in a long rectangle. Place the pounded butter block on top and pull the edges of the dough over the butter to cover it entirely. Press seams to enclose all of the butter.
The 4 roll-n-folds
This is the trick to all the flaky layers.
Roll-n-fold 1
- Roll: With seams up, hold the rolling pin horizontally to your body and pound the dough in the same direction to lengthen. Roll in the same direction until it’s the length of 1.5 rolling pins. Make sure it is never sticky. Dust lightly with flour if needed, but brush excess flour off. Once rolled out, dust off the flour.
- Fold: Fold one end in and then the other end in so it overlaps (like a trifold brochure). Flip the dough over and turn 1/4 turn so that the openings are horizontal to you.
Roll-n-fold 2
- Roll: Hold the rolling pin horizontal to your body and roll it again to lengthen it to the same length. Dust off the flour and fold like a trifold again. Turn 1/4 turn. Roll just a bit and flip it over. Roll it a bit more. Dust off flour on both sides.
- Wrap: Wrap in parchment paper and put in refrigerator for 10-15 minutes.
Roll-n-fold 3
- Fold: Take it out of the fridge. Again, place the opening of the fold horizontally to your body. Dust with flour and roll to the length of 1.5 rolling pins. Fold it like a trifold and flip it over.
Roll-n-fold 4
- Turn: Turn 1/4 turn. Roll again to a length of 1.5 rolling pins. Clean off the flour while the dough rests.
Last roll
- Roll: Turn 1/2 turn, roll more. Turn 1/2 turn, roll more. Turn 1/4 turn so that the length of the dough is now horizontal to your body. Dust off flour on top and under the dough. It should stick slightly to the granite. Roll one more time lengthwise.
- Cut: Cut the rectangular dough into long triangles using a pizza cutter or a sharp knife. Stretch a bit and roll the point of the triangle until it forms a croissant. Place the shaped croissants on parchment paper-lined baking sheet seam side down.
- Brush: Using a pastry brush, brush egg wash (1 egg and one egg yolk whisked) on top of the dough and let rise.
Bake now…
- Bake: Brush with egg wash a second time. Then, bake at 370F until golden brown and flaky.
…or freeze
- Freeze: Instead of brushing with a second egg wash, place the unbaked croissants in the freezer. It’s best to place the parchment-lined pan in the freezer. Once the croissants are frozen solid, you can place them in a Ziploc bag. When you’re ready to bake them. Take them out of the freezer to thaw. They will rise a little more.
- Bake: Brush with egg wash and bake at 370F until a deep golden brown.
How to serve croissants
Serve a freshly baked croissant on a plate with a side of mascarpone cheese and berries, lemon curd and fresh whipped cream or just a plain old cup of coffee.
Storage
Leftover croissants can be stored in an airtight container on the counter for 2 days and in the refrigerator for up to 1 week. They can also be frozen for up to 3 months.
Frequently Asked Questions
I highly recommend using fresh cake yeast for this recipe. It brings a richer flavor, better texture, and a more authentic touch to your French croissants. Unlike dry yeast, it blends seamlessly, creating those soft, flaky layers that make your croissants irresistible.
Just pop them in a preheated oven at 350F for about 5-10 minutes. If you’re in a hurry, you can microwave them for 5-10 seconds.
Yes. You can freeze the formed croissants without brushing them with egg wash and bake the next day. Just make sure to let them thaw completely before baking.


Hi! Thanks for sharing this recipe! I have two questions : Why the measures are like: 13, 665,.? I’m just curious … and the Second question and most important : how many croissants in average, can we make with your recipe? Thank you so much, I am from Brazil. 🙂
Oh, thank you so much for sharing this recipe! I’ve been trying for years to replicate the croissants I had in Paris, but never got it quite right. Now I can enjoy proper French croissants again 😀
Thanks for sharing this!
I want to try these soon. Good to know about the different kind of yeast. I don’t know that i’ve seen it, but then again, i never knew to look.
I don’t even cook but yums, that looks better than anything that’s over here haha. Please make your next blog about rice and beans, i could follow that like a champ. I can make brocoli too.